Confessions Of A Professional Organizer: Part 1

Confessions Of A Professional Organizer: Part 1

Do you find it hard to believe that a professional organizer has anything to toss out?

Do you struggle with tossing things out?

Do you struggle with what to do with your photos?

Check out this short video on Confessions of a Professional Organizer then check out the following tips from Getting It Together:

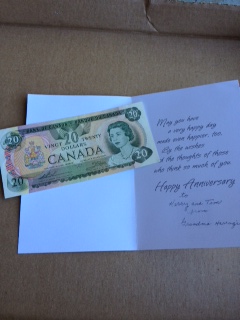
Tip 1: It’s important to know your limit. I have one Rubbermaid container that holds all my photos/photo albums. If the lid doesn’t shut then it’s time to downsize some of the photos. This is what happened recently when I brought a photo album home from my mom’s place.

Tip 2: Like me, you might have pictures of people from your past that are no longer in your life. If you look at a picture and it brings you joy keep it. If you look at a picture and it doesn’t bring you joy then it’s time to toss it. Also keep in mind, how many pictures do you need to tell the story?

Are you wondering why I wouldn’t digitalize all my photos?

I enjoy holding the actual photo album or the pictures and flipping through them. I find that I hardly ever look at pictures that are on my computer. We have so much time on our computers that it’s important to step away from them. My photo albums help with that.

Of course, all the pictures that I take with my digital camera or phone are on my computer and I don’t print them. The photos that are in my Rubbermaid go back from pre-digital pictures. Maybe one day I might digitize them all.

What are your thoughts on that? Leave them in the comment box below.

Please share the love by sharing this link with your family and friends and also posting it on social media.

And check out www.gettingittogether.ca

By |2020-09-22T20:11:37+00:00September 22nd, 2020|Home Organization, Organization Tips|12 Comments

Downsizing Your Memorabilia

Are you a sentimental kind of person?

Have you saved everything and I mean everything from your children’s past?

Would you like to get a handle on your memorabilia?

Check out this short video for some very quick simple tips on downsizing your memorabilia.

and if you like it please click the” like” button and then pass it on to your friends and family.

Then read on for Getting It Together’s Top 3 Tips on downsizing your memorabilia.

We all go through different stages in our lives. At one point you may have kept everything that had any sentimental value to you. Then as time moves on you may have thought that some of this “stuff” was holding you back. Or maybe like me you were forced to downsize and decided that you were not going to move all of your memorabilia with you yet again.

1How many of us really even have the extra time to go through our memorabilia boxes? The only time I ever have is when I was getting ready to move.

Oh ya, I hear you. You are waiting until you retire or until you are in a senior’s home and then you will go through it all. I have yet to meet a senior who has any more time now then when they were working full time. Funny how that works isn’t it. Well that is because activities fill the time we allot them. You have 5 minutes to tidy up your kitchen before guests arrive and you can get it done. If you have all day you might procrastinate a little. This is human nature.

Tip: 1 Have one medium size rubber container per person in your household. That is the limit of stuff you will save for them or for yourself. If the container gets full then it is time to go through it and pull out some less important items. You will see as time goes on how certain items do lose their priority.

Tip: 2 Ask yourself the purpose of keeping each item. Is it sentimental? Is it from a family member who really wanted you to have a certain item? Is it from a vacation? If you do not have a concrete purpose of keeping the item then it is time to ask yourself why. Why am I keeping it?

Tip: 3 Keep your memorabilia box up high on a shelf. You do not want it to get water damage if you happen to have a flood in your basement of crawl space.

How about you? Where do you stand on the sentimental stage? Love to hear from you in the comment box below.

Enjoy your precious memorabilia items. I sure do.

PS: Did you know I offer over the phone coaching services? If you would like to live more on purpose and passion or would like a better handle on setting boundaries then please contact me for a FREE 30 minute discovery session.

Go to www.reclaimsession.com to book your session now.

How To Organize Kids Artwork – what to keep and how to store the rest

Kids artworkDo you have the next up and coming Picasso?

Do you wish you could keep every piece of artwork your kids bring home?

Do you keep all the art thinking that your kids will want it when they are grown up?

Human nature is such that we all think pretty much the same on this topic. We feel that every piece of artwork is the BEST piece. We feel that we want to keep all the kids artwork because it would hurt their feelings if they saw it in the recycle bin. We also think they will want it when they are grown up … is this so they can show their own kids? Do you have your artwork from your childhood? What are you doing with it? How many times have you moved it? Is it filled with dust and must?

I do not know about you, but I do not have one piece of artwork from my childhood. I am perfectly okay with that as I see other children’s artwork and know that mine would have looked almost identical. Plus, what would I do with 10 plus year old artwork? I really do not feel any less than by not having my artwork.

I do have a vivid memory of a piece of artwork that I did that won me $5.00. It was of a dragon. It was big and bright and colourful. The memory is all I need.

Take a quick moment to watch this video on How to Organize Kids Artwork:


Then give these simple 5 tips a try on how to organize your kid’s artwork.

Tip#1: Designate one wall or hallway for your kid’s artwork. Hang a long piece of string on that wall that looks like a clothes line but attached to the wall. Hang clothes pins from the string.

Tip#2: Each time your child brings home a piece of artwork hang it from the “clothesline”.

Tip#3: At the end of each week take a photo of your child standing beside his/her artwork. These pictures make really cool screensaver slideshows or a Pinterest board!

Tip#4: At the end of each week take all the art down off the string. Along with your child (or not) decide on ONE piece of art from that week that you will keep. The rest can be recycled, used as wrapping paper for the next Birthday party, made into greeting cards for family and friends, or turned into party invitations. You can even send the artwork off to grandparents or aunts and uncles.

Tip#5: At the end of each month you will have 4 pieces of your children’s finest Picasso. Along with them or by yourself select ONE of your favorite to store in a keepsake box. The other 3 get tossed, or repurposed as mentioned in tip #4. At the end of the year you will have 12 pieces of art. Now it is time to get ruthless again and select ONE piece that will be saved in your child’s memorabilia box or you may choose to frame this one piece or you may choose to put it in a bound book. You can also add the weekly photos that you took to this book or scrapbook. I have seen really cool bound books of kid’s artwork. If you are interested in this please contact me and I will give you the contact information.

I would love to see your children’s artwork. Please send me a picture or two. Also, I would love to hear your comments. Please fill in the box below with your great ideas on organizing your kid’s artwork or any questions you might have.

Have you set up a Pinterest account? If not please feel free to contact me. I’ll give you the highs and lows in a FREE 30 minute phone consultation. We will discuss whether you need a Pinterest account. What you can pin and why you might like to have a Pinterest account.

By |2020-06-07T20:52:40+00:00December 15th, 2014|Home Organization, Organizer|2 Comments

Organizing Family Photos

Organizing family photos does not have to be an arduous task as long as you ask yourself these key questions.

What is your ultimate goal with organizing family photos?

Who would like to inherit all your family photos?

Would you like a family photo album for each family member or just one communal album?

Have you asked your family members if they would like a family photo album or is this something that you think they would like?

Do you make a hard copy or do you put each family member’s photos on a disk?

Do you organize your album by event or chronological?

Please ask yourself these questions and get clear on your outcome before starting the project.

The reason why I am getting you to really analyze these questions is because putting together family photo albums can be tricky. The upside is it can also be loads of fun and very rewarding.

I am going to assume you want to put together a family photo album for each family member. I’ll also assume that your pictures are in hard copy format not digital.

Check out this short video on Organizing Family Photos:

Use these top 5 Getting It Together tips to move forward with organizing family photos.

Let’s say you have 2 children. One we will call Tim and the other Sue.

Tip#1: Take a big white envelope and label it TIM. Take another big white envelope and label it SUE.

Tip#2: Take one small pile, small box or one old photo album. Divide the pictures between each big white envelope. Do not worry about anything else at this point. Just the sorting and dividing of prints between the 2 envelopes. If both children are in one picture you could scan it and put the photo in each envelope.

Tip#3: Take each envelope and do a ruthless purge. Toss any photos that are out of focus. Toss any where the eyes are closed or beat red. Toss any photos in which you have no memory of taking it, do not know where it was taken and or do not know who else is in the photos.

Tip#4: Next take your envelope of pictures and sort them by date or by events. For example you could put all birthday pictures together. Then all Christmas pictures together, etc. I find this to be far more effective than trying to do an album by date.

Tip#5: Put together the album. You may choose to write a little story on each page.

Once you have completed the 2 albums watch with delight as your grown children open them and devour the pages. I am sure they will be thrilled.

Still feeling a little overwhelmed by all the photos in your home. Call me for a FREE 30 minute phone consultation. We can discuss your personal needs. I’ll give you some tips and encouragement to help you move forward with this project.

Did this video and article help you with moving forward? If so, please leave a comment in the comment box below and please share the love by sharing this blog post with your family, friends and social media peeps. Thank you. 🙂

By |2020-06-07T20:52:41+00:00June 9th, 2014|Home Organization, Organizer, Time Management|0 Comments

How to organize travel photos

Do you love to travel?

Do you love to take photos?

If you are anything like me I’ll bet you like to do both. In fact I LOVE to do both. I started traveling at a very young age. I use to collect pop/soda cans, return them for cash and put the money towards traveling. Well, okay in the early stages it was for camp, however when I turned 12 I had an opportunity to travel to Peru in South America for a month. The deal was that I would save the money for the flight and the rest of my expenses were covered. I got the travel bug right then and there. On that trip I took several photos. Now remember this was long before digital so I was mindful of not being to snap happy. With one of the best inventions … digital, we can all be as snap happy as we like. I wonder what will be next in the camera world. 🙂

Check out this short video on how to organize travel photos and then read the quick easy Getting it Together top 5 tips.

OLYMPUS DIGITAL CAMERA
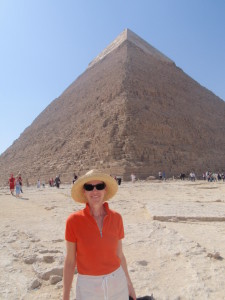
Tip#1: Volume. I hear of people that go on a trip and take 4000 photos.WOW! That is a lot of photos to try and manage. Even more to look at and even more to organize. Be mindful of the number of pictures you take. How many photos do you need of the Pyramids? I know it is easy to get caught up in the excitement of being in a country and wanting to capture all of the fun times there.

Tip#2: Organize as you go. When I travel I love sitting down at the end of the day and looking at my photos from that day. I delete any of the not so good ones or duplicates. The one thing I find with digital cameras is that you cannot always see what you are taking photos of. If it is really bright or sunny my view screen goes black. I would say that is the only downfall with my camera. How do you handle this? Please leave a comment in the box below.

Tip#3: Right away. Within the first week of being home, download your photos. Make sure you give each trip a “folder” that is properly labeled. For example “Egypt October 2010”. Be sure to back up your computer. I also put all my photos on Facebook. What I love about Facebook is that I can write comments beside each photo. I can also access my photos from anywhere in the world.

Tip#4: To print or not to print. Do not print because of fear. Print because of pleasure. I meet people all the time that print off hundreds of travel photos in fear that their computer will crash, get stolen or something like that. This is not the right reason to print photos. If you back up your computer you will always have access to them. Print your travel photos only if you are the type of person who likes to make a memory photo album for your own pleasure. These photo albums are your memories and not anyone else’s. That means that probably no one else will ever want your albums when you are gone. Ya, your kids might flip through them, but those are your memories and they have their own travel memories.

Tip#5: Take time. Did you know the average person takes only 7 minutes to look at their travel photos? Once or twice a year grab yourself a nice cup of tea and sit with your travel photos. Flip through your computer or hard copy photo albums. Relive the happy memories of those trips. Better yet, put some of your favorite photos up as a screen saver slide show.

Safe travels. I hope our paths cross somewhere out there in this old world.

By |2020-06-07T20:52:41+00:00May 26th, 2014|Organizer, Time Management, Travel Organization|2 Comments

Go Vancouver TV Crew goes to Rowena’s

Imagine a TV crew showing up at your door to do a segment on “organizing”?

What 2 words would you say first?  (Please leave your comments in the comment box below.)

  • No way
  • Right on
  • Go away
  • Get lost
  • Oh s…
  • Far out

Of course, I told them to “come in!”

I got the call a few days prior from the producers at “goVancouver”.

They asked if I would mind if they came on over to my home and did a show on getting organized.

Would I mind!?!

I was so excited I could hardly wait. I am so grateful.

Check out the video to find out more about your junk drawer aka – deferred decision drawer, a cluttered mind, photos, file cabinets and the famous 1to31 Organizing System.

It was an honour and a blast having Johanna and her crew in my home. They are welcome ANY time. Even without notice. 🙂

Thank You goVanouveronShawTV.


By |2020-06-07T20:52:41+00:00April 28th, 2014|Media Appearances, Organizer|6 Comments

5 Tips to Organizing Your Photos

DisneylandWhen asked what you would grab if your house was on fire most people say “photos.” With this being the case, why is it that most people have photos all over their homes? In boxes, in the original developers envelopes, in piles, on a memory stick and in no order? Photos, photos and more photos.

Do you like to print all or some of the pictures you take?  Since going digital I only print the occasional photo. It is usually from a trip or some of the grandkids. In my past “film” life, I printed all my photos. They are all arranged in an “organized” fashion in photos albums. I bet you would have never guessed that! 😀

Everyone loves to take pictures. Pictures of their family, pictures of their travels and pictures in general. Are you one of those people?  Ever since I got a digital camera (over 3 years ago) I carry it with me everywhere. Digital cameras are so much fun. They are so easy to use and you can go snap-happy-crazy. That being said, once you have taken all those pictures I am sure you would like to learn the simple tips to organizing them. Well then read on!

Did you know that most people spend less than 7 minutes looking at their travel photos after a trip? Your friends and family spend even less time looking at them. Do you really need all of them in print?

Check out this helpful video on downsizing your photos:

Tip #1: Get ruthless.

Key question to ask yourself: “how many pictures do I need to tell the story?” The perfect example is walking down the aisle on your wedding day. Is it safe to say that one picture would tell that story? Cutting the cake, one or two would tell that story. Toss all of the photos that are duplicates, blurry, eyes closed or red-eyed. Especially toss the ones where you do not even know who is in the picture!

OLYMPUS DIGITAL CAMERATip#2: Categorize.

Do you like your photos by date (chronological order) or do you like them by events? Trip to Disneyland, wedding day, Christmas, etc. Whether you have hard copies of pictures or digital it is time to sort into categories. This is not a one day job, as I am sure you are like most people and have boxes and boxes of photos or files and files of electronic photos. Take 15 minutes a day and sort just a few photos into let’s say a travel category. Work on this project piece by piece.

Tip#3: Store.

Do you want to keep your printed photos in photo boxes or albums? Pick one way and stick to it. I have physical albums done by date and electronic albums done by event. This works best for me. Be sure to back up your electronic files.

Tip#4: Label.

Please be sure to put dates, names, events and any other interesting information on your photos. What is interesting is that I come across boxes of photos while working with  people with their organizing and there is not one piece of information about any of the photos. If your plan is to pass these photos onto your children, then make sure they know who everyone is.

Tip#5: System.

Starting from today, get a system in place for your photos. Any pictures you take from here on in will follow this new system. You can implement this new system while you are working on your photo organizing project.

Feeling a little overwhelmed with the volume of photos? I would love to support you in moving forward with organizing your photos and preserving all your fond memories for you and your families future. For a FREE consultation to discuss how we can move forward with this project, click here.

By |2020-06-07T20:52:42+00:00January 20th, 2014|Home Organization, Organizer|0 Comments

A Cluttered Life – what is hiding in your box?

Has this ever happened to you?

You moved from one home to another.

Prior to the move, you decide to downsize, purge and toss. You have the best of intentions. You start off in one room. Before long you are getting distracted and losing focus. All of a sudden the phone rings with a better offer on the other end. You know what I mean. You decide the better idea would be to just simply pack everything and toss/clear out the clutter when you unpack in your new pad.

Check out this short video on a cluttered life:

Fast forward.

You are in your new living space. Time goes by.

There is a box or two sitting on the sidelines. What are your thoughts each time you pass that box? Maybe you even kick it out of the way. Are you saying “I must empty the box.” “What is in that box anyway?” These thoughts are causing mind clutter.

26yearnoteThe other day I was working with a client and such a box appeared. It had been neatly, well actually not so neatly, packed 26 years ago. One of those last-minute tossing in and go boxes. Upon opening the box we discovered unopened greeting cards from her second wedding anniversary. Inside one card was a crisp new 26 year old $20 bill. Bingo!! Let’s open all the cards. Another envelope had a cheque from her grandmother for $75. How come the grandma never questioned her out of balance bank account for 26 years? Conscious or subconscious, this box has been weighing heavy on my clients mind. Thinking about it and worrying about it takes up precious time. Not to mention paying to have it moved and storing it in the garage.

Here are my top 3 tips to helping you with a cluttered life and how to de-clutter it.

Tip #1: Take the 15 minutes to do it right. Instead of tossing things into a box simply take the 15 minutes to deal with the stuff you are about to dump into that box. Book those 15 minutes with yourself like it is a client appointment. Put this appointment right in your calendar. It is a date with yourself and the box.

Tip#2: Set up piles for keep, shred, toss, recycle or donate. Handle each piece of paper once or each item once. Putting it in one of those piles. The key factor here is to stay focused on that one task for 15 minutes. That one box. Turn off the phone, email indicator, close the door, do whatever it takes. Just think how clear your mind will feel once you have emptied that box.

Do you have more than one such box? If so, handle one box at a time in 15 minute increments.

Tip#3: Once you have your piles, you need to deal with them. The toss and recycle piles are the easiest. Donate is easy if you remember to put the items in your car and drop them off at your local charity. Shred is straight forward. Get your kids to do that for you if they are old enough or you can do it while watching TV. The keep pile is where the rubber meets the road. Take each item and deal with that item. Does it need to be filed? Does it need to be put away? Do you need to set up a system for some items?

You will be surprised at how fast you move if you have the 15 minute timer on and stay focused.

We are humans and take the path of least resistance. You do not want to do this when it comes to your boxes. In the long run it will save you so much grief and stress. Kiss a cluttered life goodbye.

By |2020-06-07T20:52:43+00:00September 2nd, 2013|Home Organization, Organizer, Organizing to Move|0 Comments

Do You Need to Hire a Professional Organizer?

Are you suffering from too much stuff in too small a space, too much stuff in a large space or simply too much stuff?

Do you have trouble locating important information in your office?

Can you find what you are looking for without getting stressed out?

Do you lose your keys, phone, eye glasses or kids?

Do you need to hire a professional organizer?


 Check out this video to see.

Ask yourself these questions:

  • Have you ever thought “there has got to be a better way to manage all your papers”?
  • Is it a challenge for you and your family to get out the door on time each morning?
  • Are you feeling overwhelmed?
  • What is your stress level? Would you like it lower?
  • Are you embarrassed to have friends or family over?
  • How would you feel if the neighbours dropped in unexpectedly?
  • Does it take you more than 20 seconds to find what you are looking for?
  • Would you like systems?
  • Would you like your kids to be more organized?

If you answered “YES” to any of these questions, it might be time to hire a professional organizer.

I know of a really great one! 😀

I will encourage, support and empower you with moving forward in getting organized and staying clutter free. I will support and encourage you with the purging of stuff.  Most importantly I will give you your life back.

Let me know what area in your home is bugging you the most. Leave your bug list in the comment box below. I will give you a tip to get started right away with getting and staying clutter free.

Have you taken advantage of your FREE session yet?

If not then please ease on over HERE and let’s get started today.

We can discuss if you need to hire a professional organizer, or if you need some productivity coaching sessions or maybe you need just a little pep talk.

 Either way I am here to support, encourage and empower you with moving forward.

A Stress Free Organized Move

Stress Free Organized MoveAre you getting ready for a move? Do you dream of a stress free organized move? Would you like support from the experts? How would you like to be really on top of things?

Here are my top 5 tips to a Stress Free Organized Move:

Tip#1: Hire movers. Gone are the days of trying to do everything yourself. Gone are the days of a case of beer and a bunch of your guy friends. They are all too concerned with their backs now. You are busy. Your friends and family are busy. Professional movers have all the right boxes, packing supplies, dollies and manpower. They can get you packed and moved quickly and efficiently. If something breaks they cover it. If it is pouring with rain they get wet. Professional movers are worth every penny. I know of some great ones.

Tip#2: Pack a suitcase. Pretend you are going on a 2 week camping vacation. Prior to the movers arriving, pack a suitcase with clothes, your kid’s favorite toy or doll, towels, exercise attire, toiletries and a good book. This saves you time searching in your boxes for some much needed necessities. Be sure to keep a set of sheets handy along with a place setting for each member of the family. Have a box that is labeled “open me first.” You can arrive at your new home, set up the beds, have something to eat off of and have clean clothes in the morning.

Tip#3: Start early. How long have you lived in the place you are moving from? Clutter does not happen overnight, so therefore it is not cleared overnight. There may be several items to donate, sell or give away before you move. This all takes time. One comment I hear often is “I’ll sort and purge once I move into my new place.” I hate to be the one to burst your bubble but most people NEVER get around to doing that. Do you have any unpacked boxes in your house? People seem to underestimate how long it takes to pack up a house or condo. Start early by packing non seasonal clothing, china, books and any other items that are not needed day to day. Let the movers do the rest.

Tip#4: Pack a cooler. On moving day pack a cooler filled with must have food items. Have snacks for the kids, movers and yourself. Remember some of your favorite drinks as well. Grab a bottle of Champagne. You are going to want to celebrate your stress free organized move. Ask a friend to bring over pizza or a casserole to your new home. I had a friend do this and it was a life saver. It also made me stop and take five. We had a very casual fun dinner. They helped unpack for dessert.

Tip#5: Hire an organizer. This is really the most important part of your move. You will want to do all the sorting and purging long before your moving day. Did you know a professional organizer will support you in a stress free organized move? You will save time, energy and most importantly, money. You will only move items you love, need and use. Unpacking will be a dream.

Call today for a FREE 30 minute phone consultation.

We will discuss more tips on how to have a stress free organized move.

We will also discuss your move and provide the support you might need. Click here.

By |2020-06-07T20:52:43+00:00July 22nd, 2013|Home Organization, Organizer, Organizing to Move|0 Comments

Title

Go to Top